Showing posts with label clocks. Show all posts

Wednesday, January 18, 2012

Back To Basics

I am back to square one.

I told myself I was going to write this blog everyday as a way to re-direct my focus and improve my work habits. So, here I am, starting from square one because I allowed myself to lose focus and let day slip away. Square one is an ok place to be-it is a place you know where to start:: step 1!

Since my blog is supposed to expose my reader to aspects of nerdy, geeky aspects of fashion and sewing, I decided to make a list of basic items you might want to start from square one if you are making a new costume or upgrading your existing cyberwear. These items are basics that I think are important to have for projects.

1. lots of colored thread, several sizes of sewing needles and at least one pair of sharpened scissors

2. variety of mechanical destash pieces: gears, cogs, mechanical clock works


3. (new favorite item) sew in flexible circuits
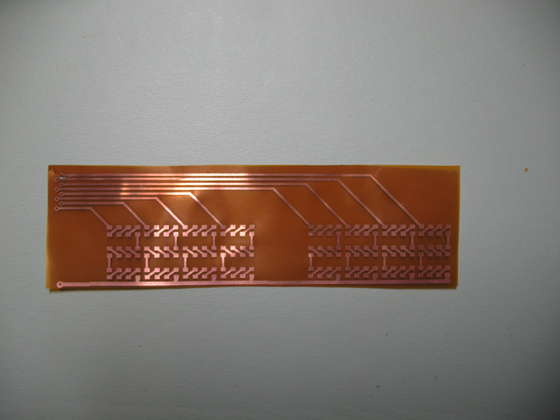

4.various tools: seam ripper, needle nose pliers, point turner and presser, soldering iron, glue gun, grommet pliers and multiple temperature steam iron. And the last and most important

5. creativity

This is a good list of basic items to get you started on a new fantasy project. Here are a couple of pictures of hand made sci fi outfits using some of these items:

Thursday, January 5, 2012

Bow Ties Are Cool

Are you tired of that phrase yet? What about Fezzes- Fez are cool? I, myself don't mind it at all and like the reminder of the first time I heard it and just how clever Matt Smith was saying it!


When the 11th doctor finished regenerating we find him sporting a tweed coat, All Saints layer boots and the smartest little bow tie. It is obvious, Matt Smith didn't introduce bow ties to fashion but he sure is rocking the look during the height of its resurgence. Before I go any further I must pay homage to Pee Wee and his trademarked red bow tie.


Paul Rubens AKA Pee Wee

I don't know if you noticed during the past Christmas season, but retail chain stores were displaying bow ties loud and proud- an array of every color, fabric and design. Prices ranged from the teens to $75.00 in some stores. It made my heart sink just a tiny bit see all the commercialism of the cutest accessory for men (in my opinion) because it was a project and new item I planned on adding to my Etsy shop. I kicked a rock or two for a minute and decided to just get over it and move on with my designs. 

I searched the internet for bow tie ideas. I already knew that I wanted my designs to be the old fashioned tie it yourself type. I found lots of how to videos and blogs and finally took a little from a few different places to come up with my design. I found my template on marthastewart.com. The template included two patterns; one a butterfly pattern and the second a straight, rectangular style. If you would like to modify the pattern you can make it into an arrow shape very easily.

When I started working on my ties it was around Halloween and I was sort of monitoring the trend for costumes and costume accessories.

The "Ringmaster" costume was one of the more popular outfits this year (according to my daughter). Most of the costumes I found were a combination of red and white with black and white stripes used in various ways. So I made a couple pieces for her with that color scheme. 

I also set out to make my first bow tie. If you read my blog from a few days ago - you will know that I have limited access to a variety of fabric. I did, however find some cool red and white striped fabric at my local Wal - Mart for only $2.97 a yard.

I made these cuffs out of scraps of the fabric. I wrapped a piece of fabric around my wrist and made sure I had a bit extra for hems. I hemmed each side of the cuff, sewed a casing down the middle of the cuff on the inside and added the elastic, again, only measuring how much by what is comfortable on my wrist. When I sewed the sides together I was done! One project down- now to tackle bow ties!


I picked up fabric here and there that I thought would work as a bow tie. I looked for funky and unusual colors and designs. The target customer I have in mind would appreciate a stylish bow tie in neon green or a design of clocks. I laid out my fabric which is exactly one yard if you are using stripes or a design because you need to keep the lines matched up. Next, I laid out my handmade template and cut out the pieces (which, there is total of 4). The last step before I began the actual sewing was lay out the pattern on PellonAfter all that cutting out- you sew a couple pieces together, leave center open turn inside out and use a blindstich to finish it off and that's it.